How to Safely Check Your Horse’s Mouth
Equine Dentist Spencer La Flure demonstrates how to safely check your horse’s teeth and mouth, which you should do two or three times a year for most horses. Do NOT put your hand into your horse’s mouth. Not only is the crushing power of the horse’s jaw like a crocodile’s, but you can get serious cuts, and possibly life-threatening infections, from a sharp tooth. Do NOT pull the tongue out; this can damage the delicate hyoid bone. Spencer does NOT recommend that you feel along the horse’s cheeks to press even lightly against the molars. He says that although some people recommend doing this, he finds that it is not very informative, and it can be painful for the horse so you can easily get hurt. You can utilize these safer methods instead to identify if there are any pro
blems. Any ONE of the following indicators of dental problems is a good enough reason to call an equine dentist.
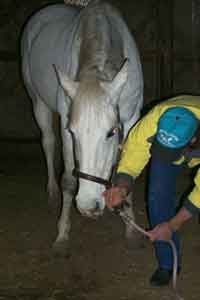
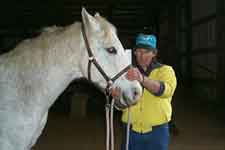
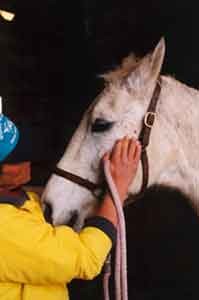
First, ask the horse’s permission. A vital prelude is to make sure he feels comfortable and safe. Then make sure he is standing square and on level ground. (Fig.1)
The following steps can be done in any order, but La Flure recommends that you begin with checking the “Front, Down, Up, Left, Right”. If any of these indicate a problem, you can stop your exam, thus sparing your horse any additional discomfort.
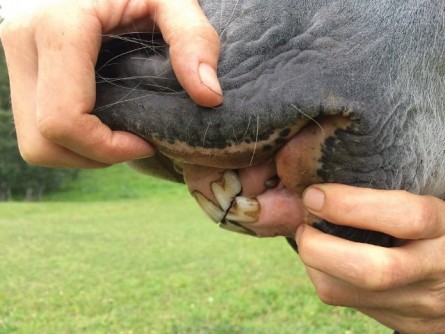
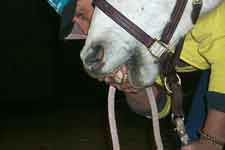
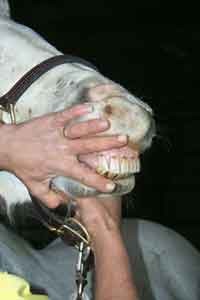
To check the FRONT, part your horse’s lips and look head-on at his incisors, the front teeth. The incisors on the left side should be the same size as the incisors on the right side. The incisor table (occlusal/biting surfa
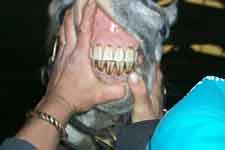
ce) should be flat and level. Too pronounced a curve will inhibit the normal side-to-side grinding movement of the lower jaw. A slant or a wave will inhibit the proper lateral movement of the jaw and will make it difficult for the horse to flex properly while turning. Incisor malocclusion indicates he favors one side for chewing. Asymmetrical chewing is a much more negative and constant influence on his balance and flexibility than is good or bad training. (Fig. 2).
When the horse’s head is DOWN, as if grazing, a side view of the fronts of his incisors should show the upper andlower incisors flush with each other. (Fig. 3)
To check UP, pick the horse’s head up with one hand under his chin. From the side
view, his lower incisors should be able to slide backwards 3/8 inch to a half-inch as his head comes up. (Fig. 4)
To check LEFT and RIGHT examine the grinding motion of the molars by “camming”. Put one hand on the bottom of the lower jaw, and the other hand cupped over the horse’s nose. Gently slide the lower jaw to one side, and then the other. It should slide sideways about Ð inch to 3/8 inch each way (about the width of a tooth), and beyond this point begin to separate as the jaws continue to move sideways. The resulting
vertical separation of the top and bottom incisors indicates the slant of the molars as they engage. The horse should not resist this motion. And you should hear all the rear teeth making contact with a grinding sound, but not hear any teeth banging with a “clunk”. The sooner the grind begins, the better. If you only hear incisors sliding like ice cubes it indicates they may be excessively long making it difficult for the rear teeth to contact. (Fig. 5)
Gently check each TMJ, but stand with your face and body clear in case the horse jerks his head up. First feel for heat above the skin. Then
touch each TMJ gently with about 4 ounces of pressure. Feel if the horse has tight tendons and atrophied muscles. This may indicate his incisors are too long. And the excessive pressure he needs to put on his TMJ to compensate and grind can be extremely painful. (Fig. 6)
Put your left hand on the right-side TMJ and your right hand on left-side bar. Slide the lower jaw side to side. You should not feel any heat or clicking near the TMJ. Reverse hands (your right hand on the left-side TMJ and your left hand on the right bar) and repeat the sliding. The motion of the two sides should feel the same. Listen by the horse’s nostrils as he chews. You should not hear the incisors sliding or striking, or hear the molars clunking. When only the incisors contact, the jaw feels like the front teeth slide like two ice cubes across each other.
Note how the bars feel. Are there any bumps or tears from the bit? If you find a callous along the bar where a wolf tooth is due to erupt it is a sign that the bit is painfully rubbing the gum across the unerupted tooth. Are there wrinkles or a bundled up gum in front of the first cheek teeth? These can harbor infections and are caused by poorly fitted bits and excessive pulling.
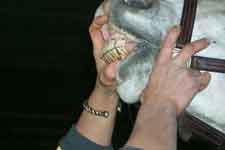
Part your horse’s lips and look at his incisors from the side. Line up and compare the occlusal surface plane with the bar on that side. (Fig. 7) These should be nearly parallel – no more than 10 to 12 degrees difference. In a “parrot mouth”, for example, the incisor plane slants downward (in comparison to the bar) at the fore end, and inhibits the normal forward and backward motion of the lower jaw. Therefore hooks can form more easily on the back molars of the lower jaw and the front molars of the upper jaw. An overbite, in contrast, is when the upper incisors are further forward than the lower incisors. A horse can have both a parrot mouth and an overbite.
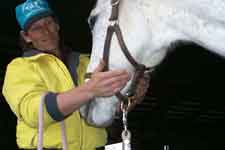
Put your thumbs at the ends of the facial crest (cheekbones) one either side of the horse’s face.
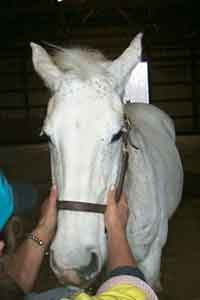
Your thumbs should be level, of equal distance from the end of the horse’s face. How well an asymmetry can be alleviated depends upon the horse’s history and the cause of the asymmetry. (Fig. 8)
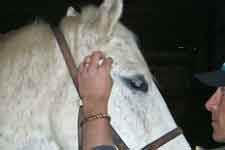
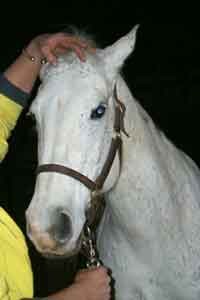
Look at the horse’s ears and eyes when they are directed forward. Note if one is higher than the other. This may indicate asymmetry of the skull, eyes, and molars. Asymmetry can also cause spooking as perception of objects may be different in the field of view of each eye. (Fig. 9)
Check the temporalis muscles. These muscles originate by the poll, at the hole over the eye and attach to the lower jaw. They should be equally developed and lie flat and smooth. If the muscles show overdevelopment, it means the horse is doing too much upward and downward chewing, and not chewing properly side-to-side. (Fig. 10)
Check the masseter muscles at the cheeks for equal development and flat contour (no dips from atrophy or bumps of spasm, or scars). If the horse is chewing more with one side, one muscle will bulge compared to the other. Also look for areas of atrophy. These are most common near the TMJ, and their asymmetry is often telltale of a problem. (Fig. 11)
Check for unevenness in the skull. The sutures between bone plates should be flat and symmetrical. (Fig. 12)

On a young horse, feel for dental cysts on the underside of the lower jaw. Between the ages of 2-1/2 and 4-1/2 years old the horse sheds 24 deciduous (baby) teeth. Three to six months before the horse sheds a tooth, you can feel the new tooth growing from the cyst. The cyst should go away about 3-6 months after the baby tooth is shed. These occur in the upper jaw as well and can reduce airflow through the nasal passages. (Fig. 13)
Smell your horse’s mouth. It should smell fresh and clean. Bad breath can indicate tooth decay, gum disease, or infection. In the younger horse, 2 to 4 years old, it can indicate a retained “cap” or baby tooth.
We would like to thank Renee Sherrard-Luther for letting us photograph her mare, Dekor’s Delight, at Rolling Hills Ranch. Renee is Head Instructor of Freedom Hills Therapeutic Riding Program, Inc. in Port Deposit, Maryland; FHTRP@aol.com, 410-378-2200.
For more information:
Spencer La Flure, EqD Adv. Cert., aka “the Tooth Fairy”
Gentle Equine Dental Care, Circle L Ranch
869 High St.
Athol, NY 12810
518-623-9967
16 August 2011
By: Susan Ajamian
Demonstrated by Spencer La Flure, EqD Adv. Cert.